Dikablis Control Center
Control Center
Control Center (called D-Lab Control in the reference manual) allows you to control the Recorder program, so that you can remotely create a new subject, start and stop recording, and mark events which were preconfigured in the D-Lab program. Control center works on one computer and sends controls the Dikablis Recorder through ethernet connection.
Connecting Remotely To Recorder
In order to control the Dikablis laptop's Recorder program on a second computer with an ethernet cable:
- Physically connect the ethernet cable
- Determine the local area IP address of the dikablis computer (you can use ipconfig /all in the windows command terminal)
- Open Recorder on the dikablis laptop
- Open Control Center on the second computer
- Under outgoing connection settings, type in the IP address of the dikablis comptuter, and use port "2001"
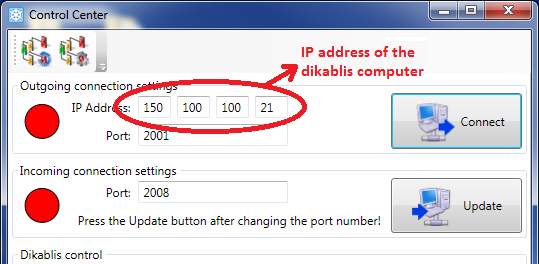
- Click on "Connect"

The red circle next to Outgoing connection settings should turn green, and you should be able to start and stop recording by pressing the corresponding buttons at the bottom of Control Center.
In order to control the starting and stopping of events, you should first set up events in D-Lab, export as .xml, then transfer this file to the computer running control, and import it into the Control Center program. You can manually start and stop events by clicking on them, or if you have alternate triggers configured with these events (from D-Lab), then you can use matlab to control the starting and stopping of events through the Control Center.
Note: Make sure the Recorder program on the Dikablis laptop is opened when using Control Center, as network communication occurs through this program.
Note2: when doing remote event marking through Control Center for consecutive subjects, you may need to close and re-open control center between subjects.
Remotely Marking Conditions
Manually
After connecting Control Centre with Recorder, click on the top left icon to select your Test Conditions.

Note: The red circle in Outgoing connection settings should turn green once connected to Recorder
Browse to your test conditions XML file and load it into Control Centre. Once loaded, Control Centre should look something like this.

Clicking on a condition will mark the start of it in your experiment, clicking on the same condition again will mark the end in your experiment. You may start and stop as many conditions as you like during your experiment. For example, you may start conditions A and B, then stop A, then start C, then stop C, then stop B, then end the experiment by stopping the recording in the Recorder Software.
Automated
MATLAB code can be used to do the above automatically while an experiment is running. Instructions on how to do this can be found HERE. The MATLAB commands are used in a similar fashion to marking manually and follow the same rules as above. Marking conditions (manually or automatically) in Control Center is the only way to easily mark your trials for use with D-Lab.