Dikablis Recorder
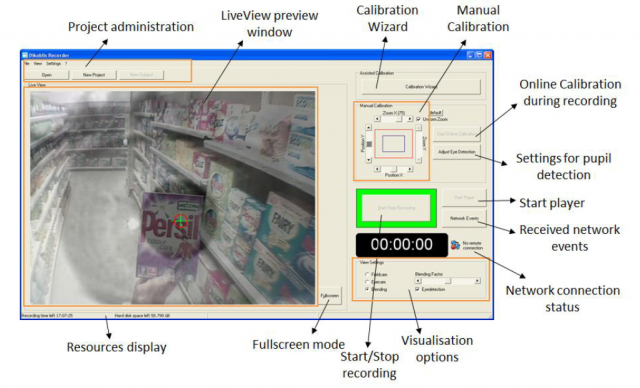
Before opening Dikablis Recorder, make sure that the hardware is assembled properly. If so, open Recorder and you should see video from the eye and/or field cams, and be able to switch or blend the videos using the visualization options in the lower-right panel.
Dikablis Recorder is used to calibrate eye-tracking and record eye-cam and field-cam videos during the testing session. Generally, it's best to use the automatic calibration, and then manually adjust the achieved settings if needed to be more precise.
New Project/Subject
To begin testing a new subject, open an existing project or create a new one, then create a new subject within that project.
Note: A project must be opened/created before a new subject can be created.

Trigger Definition
When creating a project, you can define triggers—timestamped events in the 'journal.txt' file, of key presses—for all subjects in that project. Since these triggers cannot be used with any Dikablis software for analysis, they are meant to provide an easy method for marking the 'journal.txt' file to be used for custom manual analysis, such as SSPS. Triggers can be defined in the 'Settings' menu at the top of the Recorder software window. Triggers can be created, saved or loaded in the 'Trigger Definition' window but must be done after a project is created or opened but before a subject is created/opened. After triggers are defined, they can be used for all subjects within the project. Triggers must be created or loaded after opening or reopening any project. During a recording session, these triggers can be used by pressing the key assigned to the trigger during trigger definition and only the computer running the Recorder software may be used to mark trigger events. Single-mode triggers will mark each frame with a '0' signifying that nothing is happening. If the trigger key is pressed, signifying a single event occurrence, it will mark the frame with a '1'. Interval-mode triggers will mark each frame with a '0'. If the interval trigger key is pressed, signifying the start of an event, it will mark the frame with a '1' and will continue to mark each frame with a '1' (instead of a '0'). When the interval trigger key is pressed again, signifying the end of the event, it will mark the frame with a '0' and will continue to mark each frame with a '0' (instead of a '1').
Note: trigger markings in the journal.txt file may not line-up with trigger headings
Calibration Wizard
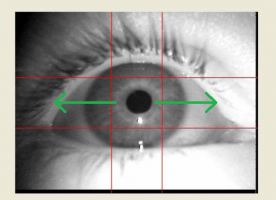
Start the calibration wizard. When instructed, adjust the eye-camera gently so that left pupil is centered in square (note: the eye-cam is meant to film only the left eye—don't try to bend it towards the right eye!). Then have the participant track your finger from side to side horizontally, and make make sure the pupil remains within the horizontal lines.

Next, you can mask dark areas such as eyelashes and set a threshold to optimize pupil detection. Have the participant look around to make sure the pupil is still detected. There's also an expert mode pupil detection option. Next, calibrate to synch up the eye and field cams by having the participant look at one point in each quadrant of the environment, and marking these points in the Recorder software with a mouse click. You should calibrate from the same distance as when testing. When you are done calibrating, click finish.
Press 'start record' when you want to start recording, and 'stop record' when your experiment ends. You can repeat to add further recordings to the participant. It is possible to manually recalibrate while recording- to do this, press "start online calibration". You may want to do this if, e.g., the headset shifts while testing.
Data is saved in the "online" folder of the subject specified. This is distinguised from the "offline" folder, which is where data is saved after offline editing. After recording, 3 files are saved to the online folder: the field-cam *.avi video, eye-cam *.avi video and a *.txt file with the prefix "journal" which includes keyboard and network event triggers. Note that videos exceeding 1GB in size are split up, but automatically put back together in the Player and Analyis software.
Dikablis Recorder Network Interface
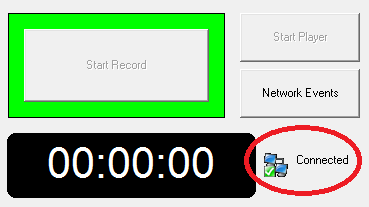
The TCP/IP port can be configured to control the Dikablis Recorder from another computer via the Dikablis Control Centre. By default port 2001 is used for this. Journal data can be received over network by a second port, by default port 2001. These defaults (and journal data transmission) can be changed in the settings.xml file found in "C:\Programs\Dikablis\Recorder". When a connection is made between the Control Centre and the Recorder, the network connection status will change from "No Remote Connection" to "Connected" as shown in the picture below.
