Dikablis Mobile Eye-Tracking System
Hardware Setup
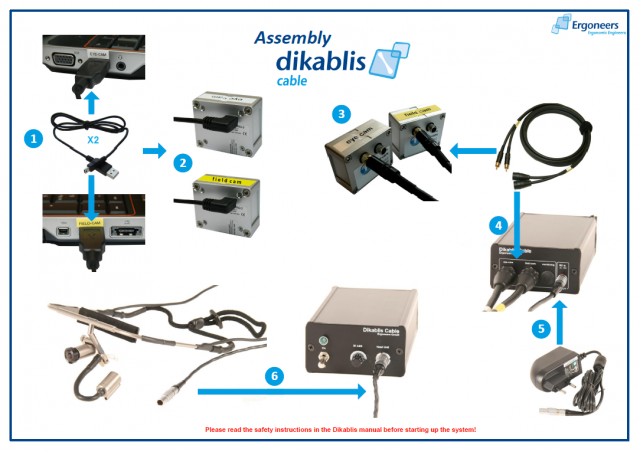
The Dikablis system in the real room consists of the following hardware and accessories:
- Recording computer including power pack (dell laptop)
- Two USB/mini USB cables
- Frame grabber box for the eye camera
- Frame grabber box for the field camera
- Video cable
- Cable box including power pack
- Head unit
- Battery charger, 2 batteries (not shown below)
- Shoulder bag to hold the cable box and one battery (not shown below)
Software use is enabled by:
- Recording license stick
- Analysis license stick
- Dikablis installation CD
To start using the Dikablis, make sure the hardware is assembled as shown. Start up the laptop, and turn on the cable box (gently pull and switch the toggle). Make sure the recording license stick is plugged in, and open the recording software on the desktop.
Dikablis Software
The following programs are on the desktop of the Dell laptop: Dikablis Recorder 2.0, Dikablis Player 2.0, Control Centre 1.0, Marker Detector 2.1, D-Lab Essential 2.0, and Dikablis Analysis 2.0. These are briefly described below, in the order in which they would typically be run to test and then analyze one subject's data.
Although these programs can be installed on any computer using the Dikablis installation CD, the Recorder should only be used with the Dell laptop as it has been optimally configured for recording. Note however that the appropriate license stick must be plugged in to use all software except the Dikablis Player.
Calibrating and Recording
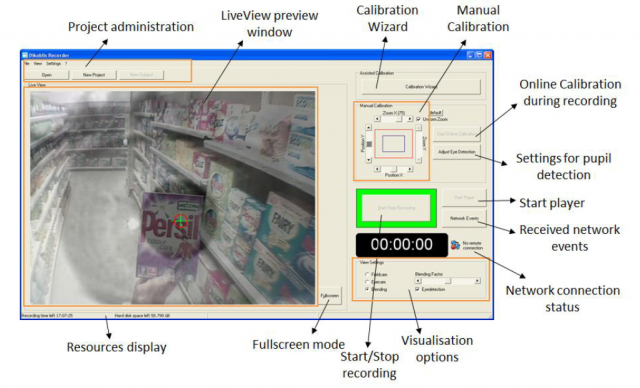
Dikablis Recorder is used to calibrate eye-tracking and record eye-cam and field-cam videos during the testing session.
Before opening Dikablis Recorder, make sure that the hardware is assembled properly. If so, open Recorder and you should see video from the eye and/or field cams, and be able to switch or blend the videos using the visualization options in the lower-right panel.
To begin testing a new subject, open an existing project or create a new one, then create a new subject within that project.
Next, start the calibration wizard, and follow the instructions. When instructed, adjust the eye-camera gently so that left pupil is centered in square (note: the eye-cam is meant to film only the left eye- don't try to bend it towards the right eye!). - define coordinates using known positions, e.g., corners of the screen, in calibration wizard - define centers of the markers in calibration wizard
- *on optitrak computer* use matlab script tom/josi optitrak scene_experiment.m - wait for network symbol to indicate 'connected' - press 'start record' -after the expreiemrnt is finished 'stop record'
Data is saved in "online" folder of the subject specified. This is distinguised from the "offline" folder, which has data when saved after offline editing.
control center
- used to stream data to another computer? configure which events get sent to network?
Playing Back
You can use Dikablis Player to play back the video you recorded using Dikablis Recorder. Note that this is not used for analysis.
Marker Detector
-run marker detector to detect markers in the video recorded by the field camera -
Manual Recalibration
-only if you know where subject looked during particular frame
-Dikablis anlayis software -open to subject- choose the frame(s) where you know where the subject was looking, e.g., fixation cross frames -click on start calibration -can manually adjust position x and y to where the subject was known to be looking -click on add, and it will add your adjustment -can continue doing this, using the slider to identify particular frames -when finished, click stop calibration -file, save as postprocessed subject name
AOIs and Gaze Statistics
-dlab software -import dikablis- select a recording and scene in left panel, can analyze recalibrated files-can add area of interest either for whole project or particular subject, can calculate gaze statistics, e.g., how often/long looked at region -click new, define using left and right clicks, select marks, press ok -compute gaze behaviour

