Difference between revisions of "Dikablis Mobile Eye-Tracking System"
(→Q & A) |
(→Q & A) |
||
| Line 173: | Line 173: | ||
-can calibrate at 2 distances but offline. While recording have them look at things in closer plane, at least 2 points not in same x and y coordinate, i.e., misaligned. In analysis software, find frame at different distance from one calibrated in which you know where the subject is looking- then manually ?set horizontal and vertical jump?and click add. File save as short distance. this will automatically appear in offline folder called short distance. | -can calibrate at 2 distances but offline. While recording have them look at things in closer plane, at least 2 points not in same x and y coordinate, i.e., misaligned. In analysis software, find frame at different distance from one calibrated in which you know where the subject is looking- then manually ?set horizontal and vertical jump?and click add. File save as short distance. this will automatically appear in offline folder called short distance. | ||
- | |||
-to save video with crosshairs use video clip section in analysis program. You can specify how much to save. | |||
Revision as of 21:19, 4 April 2012
Hardware Setup
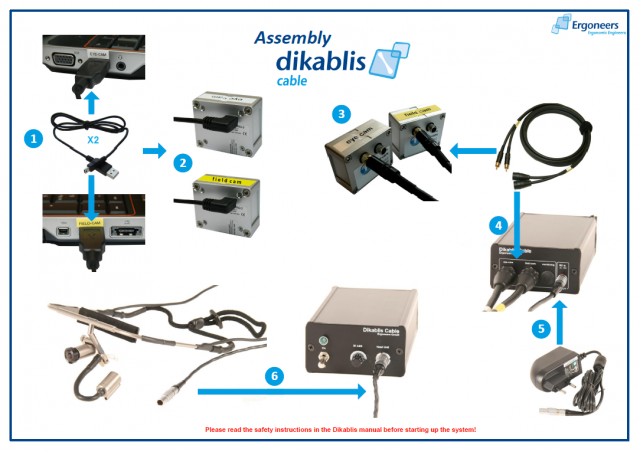
The Dikablis system in the real room consists of the following hardware and accessories:
- Recording computer including power pack (dell laptop)
- Two USB/mini USB cables
- Frame grabber box for the eye camera
- Frame grabber box for the field camera
- Video cable
- Cable box including power pack
- Head unit
- Battery charger, 2 batteries (not shown below)
- Shoulder bag to hold the cable box and one battery (not shown below)
Software use is enabled by:
- Recording license stick
- Analysis license stick
- Dikablis installation CD
Assembly
To start using the Dikablis, make sure the hardware is assembled as shown. Start up the laptop, and turn on the cable box (gently pull and switch the toggle). Make sure the recording license stick is plugged in, and open the recording software on the desktop.
Dikablis Software
The following programs are on the desktop of the Dell laptop: Dikablis Recorder 2.0, Dikablis Player 2.0, Dikablis Analysis 2.0, Control Center 1.0, Marker Detector 2.1, and D-Lab Essential 2.0. These are briefly described below, roughly in the order in which they would be run to test and then analyze one subject's data.
Although these programs can be installed on any computer using the Dikablis installation CD, the Recorder should only be used with the Dell laptop as it has been optimally configured for recording. Note also that the appropriate license stick must be plugged in to use all software except the Dikablis Player.
Calibrating and Recording
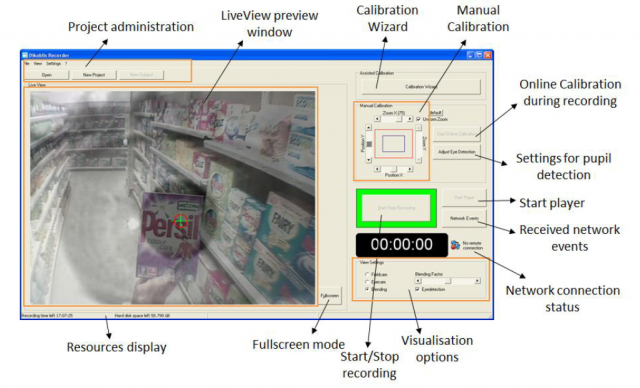
Dikablis Recorder is used to calibrate eye-tracking and record eye-cam and field-cam videos during the testing session.
Before opening Dikablis Recorder, make sure that the hardware is assembled properly. If so, open Recorder and you should see video from the eye and/or field cams, and be able to switch or blend the videos using the visualization options in the lower-right panel. Make adjustments to the field camera so that it shows what the participants is seeing *link*.
To begin testing a new subject, open an existing project or create a new one, then create a new subject within that project. Note: When creating a project, you can define triggers- timestamped events in the *.txt journal file, of key presses or network events- for all subjects in that project. However, these require manual analysis. If you need to send or receive events from another computer by network connection, you can connect an ethernet cable to that computer, then wait for network symbol to indicate 'connected'.
Next, start the calibration wizard. When instructed, adjust the eye-camera gently so that left pupil is centered in square (note: the eye-cam is meant to film only the left eye- don't try to bend it towards the right eye!). Next, you can mask dark areas such as eyelashes and set a threshold to optimize pupil detection. Have the participant look around to make sure the pupil is still detected. There's also an expert mode pupil detection option. Next, calibrate to synch up the eye and field cams by having the participant look at one point in each quadrant of the environment, and marking these points in the Recorder software with a mouse click. You should calibrate from the same distance as when testing. When you are done calibrating, click finish.
Press 'start record' when you want to start recording, and 'stop record' when your experiment ends. You can repeat to add further recordings to the participant. It is possible to manually recalibrate while recording- to do this, press "start online calibration". You may want to do this if, e.g., the headset shifts while testing.
Data is saved in the "online" folder of the subject specified. This is distinguised from the "offline" folder, which is where data is saved after offline editing. After recording, 3 files are saved to the online folder: the field-cam *.avi video, eye-cam *.avi video and a *.txt file with the prefix "journal" which includes keyboard and network event triggers. Note that videos exceeding 1GB in size are split up, but automatically put back together in the Player and Analyis software.
Dikablis Recorder Network Interface
The TCP/IP port can be configured to control the Dikablis Recorder from another computer over network. By default port 2002 is used for this. Journal data can be received over network by a second port, by default port 2002. These defaults (and journal data transmission) can be changed in the settings.xml file found in c:/Programs/Dikablis/Recorder
Playing Back
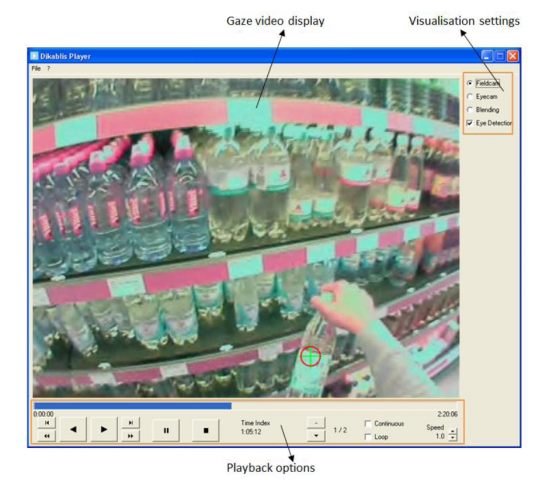
You can use Dikablis Player to play back the video you recorded using Dikablis Recorder. Note that this program is not used for analysis.
To start the Player after recording and automatically load the video just recorded, click the Start Player button in Dikablis Recorder. Otherwise click on Dikablis Player on the desktop.
Check the "eye detection" box to show the focal point as a crosshair while playing video.
Dikablis Analysis
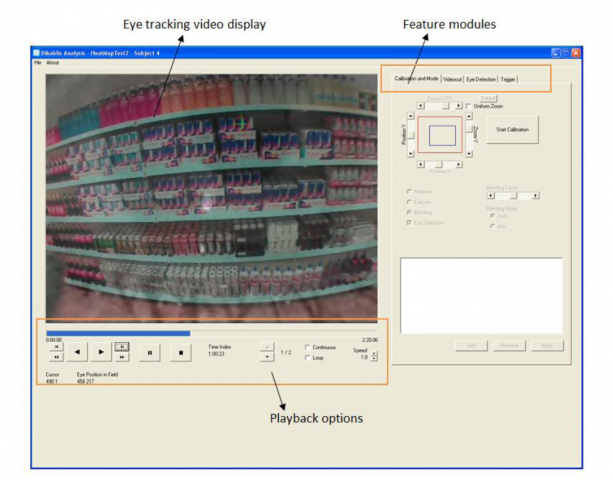
Dikablis Analysis software allows for post-hoc corrections in your calibration and pupil detection, as a preliminary step towards statistically analyzing your data with the D-Lab program. It also allows you to manually enter triggers while watching video if you intend to do statistical analysis outside of the D-Lab program.
Manual Recalibration
You can manually recalibrate if the headgear shifted during the experiment and you know where subject looked during particular frame, e.g., fixation cross.
In the Dikablis Analysis software, first open the subject's data. Offline recalibration options are found under the "calibration and mode" feature module. Use the slider beneath the video to choose the frame which you want to recalibrate. Next, click on "start calibration". To activate the new calibration click "Add", and this configuration will appear in a list. From that point on in the video, the new calibration will be applied. This can be repeated for many frames. When done calibrating, click "stop calibration".
Optimizing Pupil Detection
The rate of successful pupil identifications (as a percent of all frames) is shown under the "eye detection" feature module. 94-96% is a good value, and steps taken under this tab can increase this value.
You can select automatic *link* or manual *link* pupil detection options. For both options, click the "invalid only" checkbox to only examine frames in which the pupil failed to be detected.
Manual Analysis with Triggers
The "trigger" feature module allows for manual analysis using the triggers specified in Recorder, and also allows you to change these triggers or to add new triggers.
For example, to add a new trigger whenever the person looks at an area of interest (AOI), you could define a new trigger defined by presses of the "T" key, and whenever the person's focus is on the AOI press "T". When the focus moves away from the AOI, press "T" again. A new column for this event will be added to the *.txt journal file. This file can then be read into statistical software for analysis. Note: as an alternative to this manual analysis, you can define AOIs using Dikablis D-Lab software for behaviour objectification. This option offers automatic analysis and statistical and graphical output.
Videocut
The "videocut" feature module allows you to create a video by cutting and pasting together different video sequences.
Note that when you save changes to data in the online folder of a subject, they are automatically saved to different files in that subject's offline folder.
Control Center
Control Center (called D-Lab Control in the reference manual) controls data acquisition. This program allows you to control the Recorder program based on testing procedures preconfigured in the D-Lab program, or based on network events.
- used to stream data to another computer? configure which events get sent to network?
Marker Detector
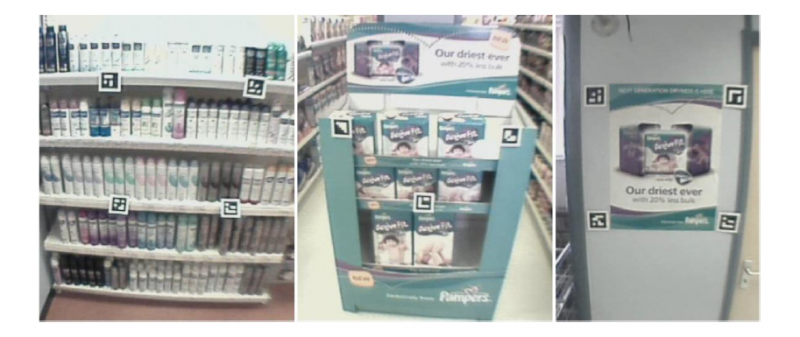
Markers are used as reference points in the environment, and are subsequently processed in the recorded video using the Marker Detector program. These reference points are needed to define areas of interest (AOIs) and depict heat maps in the D-Lab software.
Open Marker Detector. Select the file or directory where the field video is located. Click start, and the markers in the video will be detected.
AOIs and Gaze Statistics
-dlab software -import dikablis- select a recording and scene in left panel, can analyze recalibrated files-can add area of interest either for whole project or particular subject, can calculate gaze statistics, e.g., how often/long looked at region -click new, define using left and right clicks, select marks, press ok -compute gaze behaviour
Q & A
eye control- calculate in real time where someone is looking- new program. can even define AOI. based on markers placed in environment. Virtualize environment/room by telling software where AOIs are. markers must be comletley in viewe of camera, e.g,. no cables interposed. -can stream out real time marker data and AOI data via tcp/ip. e.g., Area screen value: 0/1.
-have both triggers, eyedata, and marker defined coordinate info in same file? in 2 files b/c marker detector has to be run offline (without eye control software). have to use post-hoc scripting to combine.
calibration how to do it best?
-make sure horizontal movements remain in box
manual calibration -zoom x too small, then horizontal movements will be too short; vice versa when zoom x too big
-best is to use automatic calibration then adjust manually to be most precise
-start with default make adjustments to coordinates
at varying distances -calibrate at a distance of ~2m
aside: if red x moves around not centered on pupil, in adjust eye detection part of calibration, set the isolate pupil threshold lower until only the pupil is in red; then mark out the four quadrants again.
-you can have the subject follow your finger and make sure the crosshair is following along with eye movement
-can calibrate at 2 distances but offline. While recording have them look at things in closer plane, at least 2 points not in same x and y coordinate, i.e., misaligned. In analysis software, find frame at different distance from one calibrated in which you know where the subject is looking- then manually ?set horizontal and vertical jump?and click add. File save as short distance. this will automatically appear in offline folder called short distance.
-to save video with crosshairs use video clip section in analysis program. You can specify how much to save.
